Monday 28 March 2011

Editing

For the final edit of our thriller we decided to use more credits, however we had always planned on doing this. As I have watched a few thrillers recently for inspiration this also gave me a wide variety of different types of credits I could choose from to include in our thriller. One of the thrillers that I have watched recently was 'The Shining', and this helped inspire me create the titles for our thriller. To edit the credits I needed to choose what they would say, the placement of the credits, the font, the size and the colour of the credits and I wanted the title sequence to look good which is why I spent a bit of time doing this whereas I could have done it extremely quickly instead. I also had to choose which shots to have the credits shown over so that it looks more effective.

This screenshot shows me doing the first part of editing the credits. This part involved me choosing what the credits will say in the thriller. To help me complete this I used http://en.wikipedia.org/wiki/Opening_credits. I used this website because it showed me the different credits which I could include in my thriller and what order to place them in and I did this so that my thriller was convention and also so that it looks professional. I decided that the first title in our thriller will read 'A film by Robert Hartman'. I have chosen this title first because it shows who the film was created by which is normally the first title in the title sequence. We also decided as a group that it would be better to make up sensible names rather than using our real names. As you can see in the screenshot, this part of the editing involved me changing the font, font size and whether to have it in bold and italics. I decided on the font Berin Sans FB Dami and this is because it is easy to read and looks smart. I also decided to have the font size of 26 so that it isn't too small but it also isn't too big and it is easy to read. I then decided that it would be effective if the titles were in bold because it makes them stand out more. This part of the editing also gave me the option to edit the alignment of the text and I thought it would be more appropriate to have the text in the middle. I had to do this editing for each title that I was included in our thriller such as the production company, the director and the title of the thriller etc.


This screenshot shows me doing the next part of the editing for the credits. This part involved me choosing the placement of the credits. This meant that I could choose where to place each title in the shot. I believe that I chose a suitable placement for each title so that it looked effective, noticeable and also flowing with the rest of the thriller. However this part of the editing was more difficult than it looks because I am a bit of a perfectionist and I wanted to have the titles in the perfect position which meant that it took me a little while to complete this because I was able to place the credits anywhere on the shot.


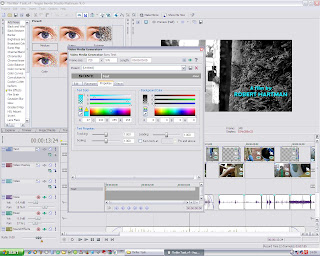
This screenshot shows me doing the final part of editing the credits. This part involved me changing the colour of the titles. This part probably would have taken me ages to complete because of the wide variety of different colours to choose from. However I already had an idea of what colour I wanted the titles to be. Although I slightly knew what I wanted to do this part of the editing probably was still the most time consuming because I wanted to make sure that I used a suitable colour which also looked professional. As I have previously mentioned, 'The Shining' inspired me when it came to creating the credits. This is because I enjoyed the colour of the credits which were used in the opening sequence of the film and thought it would be an extremely good idea to use a similar style in our thriller and I believe that this worked because in my opinion because I think that it suits our thriller and looks very good.


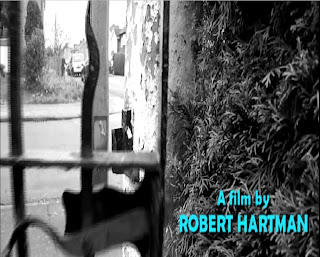
We decided that we would keep the cross-cutting the same because it looked professional and we had received some positive feedback on it. We also decided to keep some shots in black & white and the others in colour for the same reason. Again we decided that we would only use straight cuts because they are a convention for thrillers as they make the thriller fast paced and it will also keep our thriller flowing. We also added in two white screens which are only one for split second and could be missed in the blink of an eye. The only thing that separates these two white screens are a close up of the gun which is again only displayed for a split second.

Re-filming
- We also re-filmed the final shot in our thriller. This was the shot where a point of view shot is used moving from the kitchen to the lounge where there is a dead body on the sofa. We decided to this because we didn't believe that this shot looked realistic enough. This is because the blood on the dead body was difficult to notice because of the lighting so we thought that we needed to change this. We also changed the gun which was used because the other gun was slightly old fashioned whereas this one is more modern and looks more realistic. I believe the shots we re-filmed look much better now than they did.

Music - The non-diegetic music for our thriller took us quite a while to find. This is because we wanted music which was suitable for our thriller by having a slightly mysterious and scary soundtrack. This was also time consuming because we had to find music which was not copyrighted so that we could use it in our thriller. This involved us looking at loads of websites however some didn't allow you to download music for free and others just did not have a soundtrack which we thought suited our thriller. Eventually we came across the website http://www.jamendo.com/en/, this website allowed us to download royalty free music for free. Then once on the website we typed "soundtrack" in the search bar to see if there were any suitable ones for our thriller. After browsing the website for some time we eventually decided on a piece called 'Lia e o Moleiro' on the album 'O Rio e o Moleiro' by Daniel Catarino. We decided on this track because we thought that it suited our thriller because the music builds up and creates tension and this is also shown in our thriller as it slowly builds up to the death by the victim walking towards the house and the villain making a cup of coffee and it is foreshadowing the death which is about to happen. We then had to download this piece of music from the website, however this was very simple to do.
The next part involved editing the music we had downloaded into our thriller. To do this we used the software 'Adobe Premiere'. To put the music into the opening sequence of our thriller was fairly simple. However the hardest part of editing the music was when we decreased and increased the volume of the music at certain stages in our thriller. We did this where there is dialogue, the music decreases in volume when the dialogue begins and increases when the dialogue finishes. We did this so that it was easier for the audience to hear the dialogue. Then Jonathan increased the volume of the music at end when the title 'Invite' appears and then crescendos in to silence, which gives the thriller an eerie and mysterious atmosphere.

Friday 18 March 2011

Thriller Rough Edit


Editing - Oliver, Jonathan and I decided that we would all edit different sections of our thriller so that we all were involved in the editing. We decided to edit on Jonathan's laptop because he had the 'Sony Vegas' editing software which he was very fond of and knew how to use it because he has used it a few times before. So firstly we had to upload all of our shots which we had filmed onto Jonathan's laptop before we can begin to edit our thriller.

As Jonathan had used the editing software before we all decided that he should do the first part of the editing because he was more familiar with the software. This also allowed Oliver and I to watch what Jonathan was doing so that we also knew how to use the software and Jonathan also explained what he was editing and how he was editing it so that Oliver and I knew exactly what he was doing and how he was doing it. Jonathan and Oliver did the majority of the cross cutting for our thriller because they preferred to do that and I didn't mind as I wanted to edit the titles and credits for our thriller because I had a fantastic idea of how I wanted them to look because I have watched a variety of different thrillers recently for inspiration. As we wanted parts of our thriller in colour and other parts in black & white, we then had to change some of the shots to black & white which Jonathan and I changed.

We also decided as a team to only use straight cuts in our thriller and this is because they are the most common and frequent type of editing technique. They will also keep our thriller flowing so that it looks professional and by using straight cuts it also makes it easier to make our thriller fast paced which is one of the many conventions of thrillers. However for the first draft of our thriller we did not include a lot of credits because we only decided to include the title which meant I did not do a lot of editing for the first draft of our thriller because this meant that I only had to change some parts of our thriller into black & white. We also didn't include any music in our thriller because it was difficult to find a perfect piece of copyright free music which was very suitable for our thriller and we wanted it to be perfect so we decided to spend more time looking for the music. In our thriller we also used a black screen and this was done to show a passage in time but also the connotations of black are generally negative with connotations such as death, which is why we decided to use black.

Thriller Rough Edit Feedback

As a class all of the different groups watched each other’s thrillers one after the other, so that everybody could have a look at other people's ideas and I believe that this was quite useful. This involved us giving feedback on positive and negative aspects of other thrillers and also receiving feedback for our own thriller. The feedback we received for our thriller was generally positive, stating that we used a wide variety of different shots, cross-cutting etc. were all very effective. The credits at the end were also credited for being relevant to the thriller genre. However an issue which came up a couple of times was that we need to include non-diegetic sound but we had always intending on adding this into our thriller.

Monday 14 March 2011

Filming

On the day of filming we went to Oliver's house because this is the only location for our thriller because we used his garden, lounge and kitchen to create our thriller. Before we started filming we looked at our storyboard again for about 20 minutes so that we knew exactly which shots we wanted to use and when, this also enabled all of us to know what to do and when to do it. This therefore meant that all our thriller could be filmed as efficiently as possible and this also stopped us wasting valuable filming time. We also needed to make sure that the weather was suitable for us to begin filming because we needed the weather to be clear so that there was no fog, rain or other weather which could disrupt our filming and luckily it was a sunny day so we could continue filming just as we had planned.

The filming did not take to long to do because our locations for the shots were all close together so that we didn't waste time moving from location to location. We also had to film the outside shots during the day otherwise it would have been too dark to film because you would not have been able to see the character(s) in the darkness. We also filmed each shot at least 3 times because we wanted to make sure that we had more than one take for each shot just in case we noticed something was wrong or not as good in one of the takes, which enabled us to choose the best take for our thriller and also when it comes to editing we will have more shots to choose from.

For part of the sequence it didn't matter whether we filmed at night or during the day because we could turn lights on so that the characters are still visable. We eventually decided to film during the day so that we could film this straight after the outdoor scenes. This is because it will allow us to complete all of our filming at once so that we do not have to worry about having to film the rest of our sequence. It was also more difficult for us to film because we were filming out of college which meant that we could not record during lesson, so we had to find some time where none of the three of us were busy in order to allow us to film. We also made sure that we had the props we needed to film.

The risk assessment we completed prior to filming was extremely useful to us because this enabled us to prevent any possible dangers from occurring whilst we were filming. This is why I believe that there were no problems whilst we were filming. We were careful when using the camera and the props so that nothing broke. We were also careful whilst filming making sure that none of us fell over. This is why I believe the risk assessment was very successful in preventing any possible problems.

Once we finished filming we checked what we had recorded to make sure that we had recorded every shot that we needed to and it looked suitable to start editing.

Before we filmed we believed that it would be quite simple, quick and easy to do because we knew exactly what we wanted to film such as the shots we wanted to use because of the planning we did prior to filming and this helped us out when it came to filming our thriller.

Another reason why the filming did not take ages to complete was because Oliver and Jonathan were confident in their acting roles and I was also confident in being the cameraman. I believe that all these factors contributed in enabled us to do all the filming on the first attempt. Now that we have completed the filming we can finally begin editing our thriller, which we are all eagerly excited to do.

As we planned the storyboard thoroughly and looked at it again just before we started filming we didn't need to make any changes to the storyboard. I believe this is good as it shows we did some good planning because we didn't need to change any of the shots we wanted to use. It also shows that we had a clear idea of the thriller we wanted to produce even at the early stage of creating our storyboard.

As our storyboard was very detailed there were no major changes which needed to be made however we did add a few shots and changed the order slightly. The first shot we added was a close up of the smallest gate closing after the victim had walked through and then another mid shot was added to show the victim walking which cut to an added shot which was a close up of the kettle boiling. We also added in a mid shot of back door being opened and instead of using a black screen we used three white screens which were separated by close ups of a gun which then cut to the black screen we had originally intended on using.

Sunday 13 March 2011

Thriller - Storyboard

Oliver, Jonathan and I created the storyboard after we decided what the plot of our thriller was going to be. We spent quite a lot of time on the storyboard making sure that was accurate and easy to understand. As Jonathan is the best artist out of the group and is also taking art at AS we decided to let him to the drawings and writing for the storyboard so that it will look as good as possible. Me, Oliver and Jonathan all came up with ideas such as camera angles, editing techniques and sounds whilst creating the storyboard. Some of the ideas when it comes down to creating my thriller may be changed slightly in case they are too hard to do or we have found a better idea to do instead. We created the storyboard shot by shot so that it was easier for us to understand and clearer to look at. Each shot which has been included in the storyboard has little description next to it describing what is happening in the shot and it also says whether it is being filmed in colour or whether we are going to film it in black & white.


The first shot we decided on using is an extreme close up of the kettle being turned by the murderer which is followed by a mid shot of the victim slowly and carefully opening the gate. The next couple of shots are close ups and extreme close ups of which involve the murderer taking a mug in preparation for creating a cup of coffee for himself. The next shot show the victim walking towards to the house which is a low shot and this shot is followed by a close up of the gate slowly squeaking shut behind him. The next shot is an overhead shot of the coffee being placed and stirred in the coffee mug which then cuts to a side tracking shot of the victim walking closer and closer towards the house. This is similar to the side tracking shot used in the opening sequence of ‘The Silence of the lambs’. The next shot used is another over head close up shot of the coffee being stirred which then cuts to a close up of the victims face which allows the audience to see some of his facial expressions and the background. This then cuts back to a close up of the kettle being boiled which again cuts to an extreme close up of the victim’s face which shows his eyes and this shows the characters emotions and expressions. Another cut is then used which shows a close up of the murderer pouring boiling hot water from the kettle into the coffee mug. This is then followed by a tracking shot of the victim and the camera is following him from behind watching him getting closer and closer to the house, again this tracking shot is similar to a tracking shot used in the opening sequence of ‘The Silence of the Lambs’. This is then followed by an extreme close up of the milk being opened by the murderer. The shots used so far in this sequence which involve the murderer are shown in colour and the shots used so far which only involve the victim are shown in black & white to make it seem more like a thriller and also to create effect.


The next shot we decided to use is a mid shot which is a tracking shot which again is showing the character getting even closer to the house. This then cuts to a close up of the murderer slowly pouring milk into the coffee mug. This then again cuts back to the victim however this time a close up is used to show the victim opening another gate slowly which is followed by a long shot of the victim walking towards to front door. The long shot is used to show the characters appearance and also the setting of the scene which is followed by a mid shot showing the victim knocking on the door. This then quickly cuts to a close up of the murderer stirring his coffee and he immediately stops and beings to approach the door. This then cuts to an over the shoulder shot which is used to show the victim looking at the murderer and this cuts to a point of view shot from the victim looking closely at the murderer and the murderer says calmly “Hey, come on in, man.” This is the only dialogue used in the opening sequence because we didn’t want to reveal too much in the opening sequence. Again the shots used so far which only involve the murderer are in colour and the shots so far which only involve the victim are in black & white. The next shot we used is an extreme close up of the murderer licking his licks whilst looking at the victim. This shot shows the murderers facial expressions and emotions. The next shot is and editing technique we want to use where it cuts to black and this is used to show a short passage of time has passed. The next shot used is an establishing/long shot of the murderer drinking the cup of coffee he made and this shot shows the setting which then pans across from left to right to reveal more of the scene and a gun on the kitchen work top and this then cuts to a close up of the gun. A point of view shot is one of the final shots used, which shows the murderers point of view walking into the lounge slowly and looking at the victim’s dead body lying on the couch, this is a long shot because it shows the setting and also the character. This then cuts to a black screen and the title appears which is “HIRED HELP”.

Overall I believe that the storyboard is a good planning method and it has been very successful in helping me, Oliver and Jonathan develop our ideas for our thriller. This is because it has given us an idea of the camera angles, props and different editing techniques that we want to use in our thriller, which we can then develop further. However once it comes to filming our thriller we might have changed some of the ideas slightly to improve our thriller.


This is another mind map that me, Jonathan and Oliver created whilst planning our thriller to give us different ideas for the location, idea, plot and different camera shots that we could use for our thriller.

Thriller - Rough Storyboard

This is a rough outline of our storyboard. A rough version of the storyboard would help us understand the plot, characters, shots and editing better because the success of a film usually depends of the pacing and building of the tension which is perfected by the planning and researching for the film.


This rough sketch shows the opening of the sequence with the man approaching the house, opening the gate and walking down the alley. Then we will later change the opening shot to an insert of the switch on the kettle being flicked on, to boil the water. This is because it will demonstrate the intercutting between the two actions which are happening at the same time.


The next part of the storyboard shows that we intend to use the shot of the kettle switch as the first shot because it is the first frame. This then allows the storyboard to continue from where the previous page of the storyboard ended.

To make this sequence more like a thriller we decided we needed to build the tension because this is conventional of thrillers. This can be done by start with a medium shot of the man walking which cuts to the kettle boiling and then back to the man walking. The intercutting intensifies the scene which builds up the tension and suspense.


The final stages of the rough storyboard shows the man getting towards the doorway which is intercut with the coffee being made. When the man knocks on the door, another figure appears and asks the man if he would like a cup of coffee. The shot will then cut to black for about 3-5 seconds to build the tension.

This black screen is also symbolic of the killing of the man and shows the passage of time. Black is also conventional of thrillers because of the connotations of the colour such as death. This also does not give anything away to the audience because there is no image or sound so this also builds tension.

However, we believe that the final shot will be a bit of a challenge and fairly difficult because it is one shot which lasts a while which starts as a close up of the gun in the kitchen which then goes to the lounge to reveal the dead body on the sofa. Long shots are also conventional of thrillers because they are used in such thrillers as 'Goodfellas' (1990) and 'Reservoir Dogs' (1992) and they are often used to reveal something about the character or the plot.

Our thriller will show that whilst something normal and part of everyday life is happening in one room, something violent and horrific could be happening in another room. This is why we have decided to juxtapose the shot of a man drinking his coffee, with a dead body in the next room.

Monday 7 March 2011

Character Profiles - Thriller

Casting is definitely one of the most important processes in the film making process because the characters and actors/actresses are the driving force within the narrative for the majority of the time. The opening sequence for our thriller will only include two characters which means we will be able spend more time choosing each character because there are only two actors are needed.


Character's Name: Man 1
Actor: Oliver Morroll

The first character we have decided to cast is Oliver Morroll. This is the character who is more dominant in this sequence because he is shown the most during the thriller. This is the character who is walking towards the house. We decided to call the character 'Man 1', this is because his name is never revealed in the sequence.

We believe that Oliver is perfect for the part because it requires some acting experience which Oliver possesses because he has acting in different short films which we have made previously. Oliver and Jonathan had more experience than me in this part because they have twice entered the George Spencer School Film Competition, where they finished third and second.

http://www.youtube.com/watch?v=iLIVtP0voeY
This is the short film 'Picture This', which came second in the film competition. It shows the talent which Oliver has.


Character's Name: Man 2
Actor: Jonathan Hawes

The villain in our thriller will be called 'Man 2' and this is because his name isn't revealed in the sequence so we left it for the audience to guess. This is the only character in our sequence who has lines of dialogue, which is when he greets the victim at the door and the dialogue is "Hey, come on in, man. Do you want some coffee?". This character needs to look fairly evil and sinister to the audience but not to the other character in the sequence because the audience can then see that he is quite evil but he still gains the other character's trust in coming into his house.

Jonathan does not have as much experience as Oliver when it comes to acting but he has directed a few short films and can use this past experience of directing others into his own performance.